Call/Text/WhatsApp +34631950661


How to Dismantle a Bike for Packaging or Shipping | A Comprehensive Guide
How to Dismantle a Bike for Packaging or Shipping. Protect your bike from damage during transit with expert packing tips and tools...
How to Dismantle a Bike for Packaging or Shipping: A Comprehensive Guide
How to Dismantle a Bike for Packaging or Shipping. Protect your bike from damage during transit with expert packing tips and tools.
How to Dismantle a Bike for Packaging or Shipping
Buying a bike online is an exciting experience, but it can also be a bit daunting when it comes to receiving and handling the package. Whether you’re buying a bike from Elysium Bike Shop, one of the best places to buy a bike online, or any other online retailer, understanding how to dismantle a bike for packaging or shipping is essential. Proper disassembly helps ensure that the bike arrives in good condition, preventing damage from jostling or compression during transit.
In this guide, we’ll walk you through step-by-step instructions on how to disassemble your bike for shipping or packaging purposes. This knowledge not only helps you with safe shipping but also makes the reassembly process easier once your bike arrives.
1. Gather the Essential Tools for Dismantling Your Bike
Before you start disassembling your bike, ensure you have the right tools. Using the correct equipment helps prevent unnecessary damage to the bike and reduces the time it takes to dismantle everything.
Here’s a list of the tools you will need:
- Allen wrenches: A set with common sizes, such as 4mm, 5mm, and 6mm.
- Pedal wrench or adjustable wrench: Used for removing the pedals.
- Torque wrench: If you plan to reassemble the bike later, a torque wrench will ensure the correct tightness.
- Tire levers: These are handy for removing tires from the wheels, especially when you need to pack them separately.
- Chain tool: If your bike’s chain requires removal, this tool will help.
- Cable ties and rubber bands: These are perfect for bundling loose cables and securing parts during transit.
- Bubble wrap or foam padding: To protect the bike frame and delicate components during shipping.
Having these tools readily available ensures that you can dismantle the bike quickly and without damaging any parts. Once you’ve gathered your tools, you can begin the disassembly process.
2. Removing the Pedals and Seat Post
The first step in dismantling your bike is removing the pedals and the seat post. These are two components that protrude from the bike and can be easily damaged during shipping if not removed. Here’s how to handle them:
Pedals:
- Use a pedal wrench or adjustable wrench to loosen the pedals.
- Note that the left pedal has a reverse thread. To remove it, turn it clockwise (unlike most bolts where you would turn counterclockwise to loosen).
- The right pedal is standard, so it will loosen by turning counterclockwise.
Seat Post:
- Loosen the seat clamp bolt using an Allen wrench.
- Once the bolt is loosened, remove the seat post from the frame.
- Be cautious not to damage the seat post or seat, especially if you plan to reuse them after the bike is shipped.
Tip: Keep the pedals and seat post in a small, labeled bag and tape them to the frame or place them securely in the box. This makes reassembly easier and helps you avoid losing small components.
3. Removing the Wheels and Tires
The wheels are some of the largest and most vulnerable parts of your bike, so it’s important to remove them to prevent any accidental damage. Here’s how to remove them properly:
Quick Release or Thru-Axle Wheels:
- For bikes with quick release mechanisms, open the lever, loosen the nut on the opposite side, and pull the wheel free from the bike frame.
- If your bike uses thru-axles, you will need a wrench or Allen wrench to unscrew and remove the axle before removing the wheel from the fork or rear triangle.
Tires:
- It’s not always necessary to remove the tires, but in some cases, such as for a smaller packing box or if you’re shipping the wheels separately, it’s a good idea to do so.
- Deflate the tires to make the process easier.
- Use tire levers to break the seal between the tire and the rim. You can then remove the tire from the rim.
Tip: If you plan to remove the tires, store them separately in a bag and wrap them in bubble wrap for protection. Similarly, wrap the wheels individually in bubble wrap or foam to ensure their safety during shipping.
4. Dismantling the Handlebars and Stem
Once the pedals, seat post, and wheels are removed, the next step is to dismantle the handlebars and stem. This will reduce the bulk of the bike and prevent the handlebars from being bent or damaged during shipping.
Removing the Stem:
- Use an Allen wrench to loosen the bolts on the stem that attach it to the fork. If the stem has a quill style, remove the stem completely from the fork.
- If your bike has threadless handlebars, you can loosen the bolts that secure the handlebars to the stem and remove them separately.
Securing Cables:
- It’s important to make sure that brake cables and gear cables are not tangled or at risk of getting damaged. Use zip ties or rubber bands to secure them neatly against the frame, or disconnect the cables if necessary.
Tip: Take note of the handlebar position relative to the stem so you can reassemble it in the same orientation when you’re putting the bike back together.
5. Removing the Chain and Derailleur
The chain and derailleur are delicate components, and removing them can prevent them from being damaged or getting bent during shipping. Here’s the step-by-step process:
Removing the Chain:
- If your bike has a quick link on the chain, simply separate it by hand. If not, you’ll need a chain tool to remove a pin from the chain.
- Make sure to remove the chain carefully and place it in a small bag for safekeeping.
Removing the Derailleur:
- Use an Allen wrench to unscrew the derailleur from the frame.
- Store the derailleur in a separate bag to prevent damage. It’s also a good idea to remove the derailleur hanger if your bike allows for it, as these are common parts that can bend during shipping.
Tip: Make sure the chain and derailleur are stored together in a small, labeled bag for easy reassembly. Keeping small parts organized will save you time later.
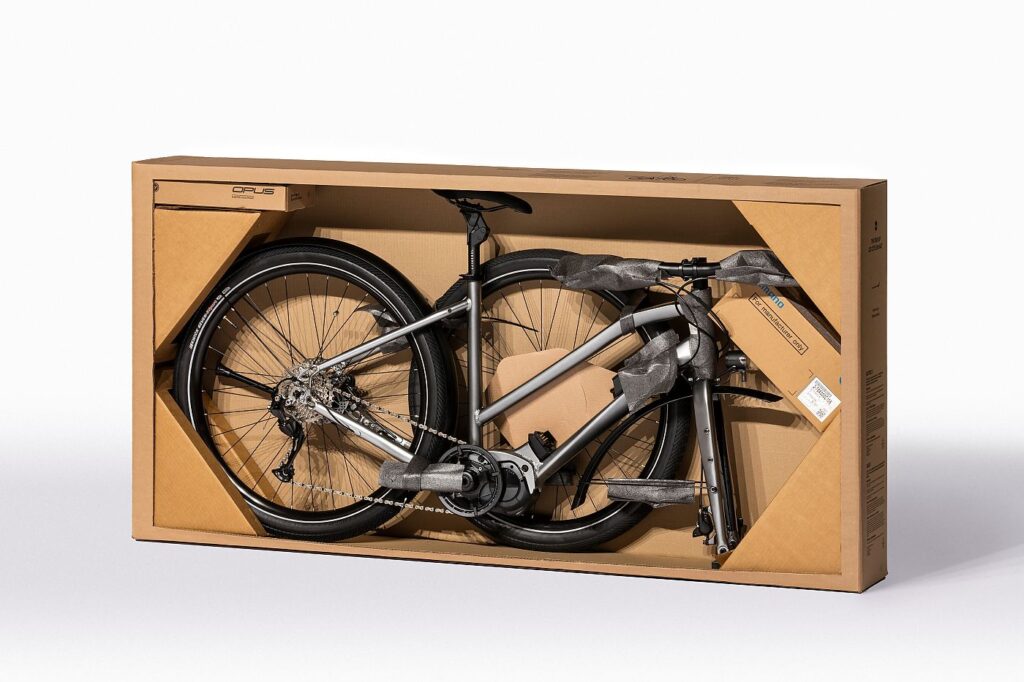
6. Packing Your Dismantled Bike for Shipping
With your bike fully dismantled, it’s now time to pack it securely for shipping. Here’s how to ensure everything arrives safely:
Packing the Frame:
- Wrap the frame in foam padding or bubble wrap to protect it from impact and scratches. Make sure to cover delicate areas like the bottom bracket, fork, and rear triangle.
- If you have the original packaging, it’s best to use it. Otherwise, you can use a bike-specific box that’s made for shipping.
Packing the Wheels:
- Wrap the wheels in bubble wrap or foam to protect the rims and spokes. If you have removed the tires, pack them separately.
- Position the wheels beside the frame, ensuring they’re not rubbing against any delicate parts.
Final Packing:
- Once everything is wrapped, place the bike in the shipping box, ensuring that all parts are secure and cushioned. You can use foam inserts, packing peanuts, or air pillows to fill any remaining gaps in the box, ensuring that nothing shifts during transit.
Tip: Double-check the box to make sure all components are securely packed. Use strong packing tape to seal the box, and clearly label it as “fragile” to ensure careful handling.
Secure Shipping for a Hassle-Free Bike Purchase
Dismantling a bike for packaging or shipping may seem like a challenging task, but with the right tools and knowledge, it can be done efficiently and without stress. By following these steps, you ensure that your bike will arrive safely and securely, whether you’re shipping it to a new location, returning it, or buying it from Elysium Bike Shop.
Elysium Bike Shop is known for its exceptional service and quality bikes. If you’re looking to buy a bike online, they offer excellent options and ensure that your bike arrives at your doorstep in perfect condition, well-packaged and ready to ride.
By carefully dismantling and properly packing your bike, you can ensure a smooth and successful shipping experience, whether you’re shipping a new bike or sending one out for a repair. Happy cycling!